Installing WordPress locally can give a blogger, web administrator, WordPress developer, or anyone who uses WordPress a handful of advantages. They can use this for designing themes or debugging plugins or codes. And one of the recommended way to install WordPress locally is with the use of WampServer. WampServer is one of the most popular and longest player in the Internet aiding WordPress users. And what’s more, the application is Free! The package itself contains almost everything you need to start and setup your own blog site onto your computer before you actually upload it to your live blog site. So if you are new to this, I hope my steps below would help you on how to setup your own WordPress locally into your PC. Please do note that I have only tried on Windows system.
What is the importance of installing WordPress locally in your computer? You can check my published article about some of the reasons and advantages of installing WordPress locally.
How To Install WordPress Locally Using WampServer
Prerequisites:
1. Download WampServer – Before you install WampServer, you need to install Visual C++ 2010 SP1 Redistributable Package for either x86 or x64. Don’t worry it will be offered when you download the WampServer.
2. Download WordPress – As much as possible get the latest and this should be the same as with your live blog site.

Steps once you have downloaded the prerequisites mentioned above.
Guide To Install WampServer
1. Install first the WampServer (assuming that you already installed Visual C++ 2010 SP1 Redistributable Package for either x86 or x64) by opening the installation package.
***Note: You can just press the Next button during the installation until you have completed it. Pretty much the default installation (i.e. directories) steps were already tested and should be working by default. But of course if you wish to customize some other settings it’s entirely up to you. Another thing is that, during the installation if WampServer finds that you have a Mozilla Firefox installed then it will ask you if you wanted it to be your default browser for WampServer – I prefer to say yes.
2. On the last part of the installation you may opt to Run the WampServer and complete the installation. This will now initiate the WampServer application and you will notice a new icon on your right tray bar.

3. At first loading, the WampServer icon’s will change from Red (offline) -> Amber (still offline) -> Green (Started/Online).
4. Once you see that the WampServer is Green then it means it is now online and you can now start with the configuration and installation.
5. First, you need to test if the WampServer installation was really successful by opening your Mozilla Firefox and typing this address/URL – http://localhost/
***Note: If you have issues or problems such us the http://localhost/ is not loading after the installation, edit your wampServer httpd.conf and update the value “Listen”
from
Listen 80
to
Listen 81
Then whenever you open your wampServer page use http://localhost:81/
***UPDATE: “Error 403 Forbidden You don’t have permission to access / on this server.” This is usually encountered by Windows 8 users when installing WampServer.
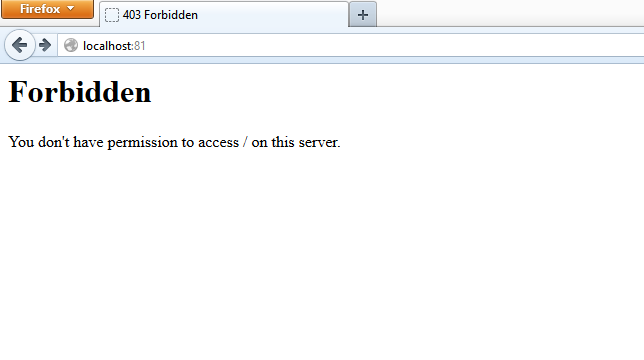
You can use http://127.0.0.1:80 instead.
6. Assuming that there were no errors and you were able to pull up the page, you will see the WampServer default index or home page.

7. Congratulations! You have successfully installed WampServer! The next thing we have to setup now before we can have the WordPress locally is the database.
Guide To Setup WordPress Database with WampServer phpmyadmin
1. You will need a database setup for your WordPress. In order for us to achieve this, we need to create a new database and that can be done through phpmyAdmin that is included in the WampServer package.
2. Simply click the phpmyadmin from the WampServer index page and login to phpMyAdmin default page. The default username is “root” and no password required.
3. Once you have login to phpMyAdmin, to create a database click on the Database tab.

4. Type the desired database name that you will use for your WordPress installed locally.
5. Select the proper Collation from the dropdown menu – i.e. utf8_general_ci.
6. Then click Create.
7. You will see a message that your new database has been created successfully. Again, congratulation! We’re almost done.
Guide To Setup WordPress Locally
1. Once you have completed the WampServer installation into your local Windows PC and setting up the database, now the next thing to do is install WordPress.
2. First, you need to extract the compressed WordPress installation package into your local PC.
3. Then copy all the extracted files to your wamp www directory (i.e. c:\wamp\www). During the transfer, it will probably ask you if you want to overwrite an existing file – index.php. This file is the index page of wampserver. So if you feel you don’t need it anymore then proceed to overwrite it. Otherwise, rename that file and continue with the file transfer.
4. Once you have completed the file transfer. Go back to your browser and open again – http://localhost/. By the way, you may noticed that my images and even the video below shows http://localhost:81/. Well, that’s because it is how I configured it.
5. You will see the WordPress welcome page below and from here we can now start with installing WordPress locally. Click the button – Let’s go!

6. You will have to fill the missing information.
- Database Name: Type in the database name you created from phpMyAdmin
- Username: Your Database username. i.e. “root” by default
- Password: Database password you created. i.e. blank by default
- Database Host: Always use “localhost”
- Table Prefix: You can assign anything. i.e. “wp_” by default.

7. Then click Submit.
8. Click Run Install.

9. You will be redirected to the WordPress Installation page, fill the missing information and then click the Install WordPress button.

10. Just wait until you see the page below saying that you have successfully installed WordPress locally.

Basically that’s it! You can now login to your local WordPress site.
For more detailed and step-by-step instructions on how to install and setup WordPress locally with WampServer, you can watch the video I uploaded showing how to install WordPress locally with WampServer.
[youtube=href=http://www.youtube.com/watch?v=YzRIz79G2xk&w=600&h=338]
Have fun!


really nice sharing i learn very clearly from this post, thanks…