If you are new to WordPress, I can give you some reasons why is it important for you to install WordPress locally. And I have explained them on this article. Here’s another way to install WordPress locally and this time by using XAMPP. XAMPP is another open source created by a non-profit group called Apache friends (ApacheFriends.org) who’s goal is to promote Apache web server. If you wanted to install WordPress locally and know little on setting up your own environment then I guess XAMPP will suit your need. It already have MySQL, PHP and Perl on its distribution package, just enough for you to install WordPress locally. Another advantage of using XAMPP is that it’s available in four distribution. So whatever operating system you are using, there is an available installation package for you to use.
Four XAMPP distributions
- Linux
- Windows
- Mac OS X
- Solaris
How To Install WordPress Locally Using XAMPP
For the steps below I will be showing the installation using Windows platform.
Prerequisites:
1. Download XAMPP – Before you install XAMPP, PHP needs Microsoft Visual C++ 2008 Redistributable package from Microsoft Download Center.
2. Download WordPress – Actually it is not only WordPress that you can install with the use of XAMPP. You can also install Drupal and Joomla. About the WordPress, it is recommended that you download the latest version.
Guide To Install XAMPP into your PC
1. Install XAMPP, this is with the assumption that you have already installed successfully the prerequisites i.e. Microsoft Visual C++ package.
[note]
During the installation, you can opt to select your own directory where you want to install XAMPP. Or you can select and press the “Next” button all through the installation, the package will select the default folders/directories for you.
[/note]

2. Once you have completed the XAMPP installation, you will be asked if you wanted to invoke or start the XAMPP Control Panel. If you want to proceed, just leave the option checked/ticked. Otherwise, opt-out the option and click on “Finish”.

3. Once you open the XAMPP Control Panel, you will only need 2 services to start – Apache and MySQL.
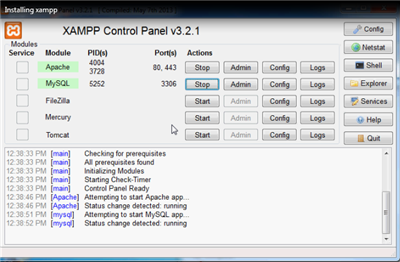
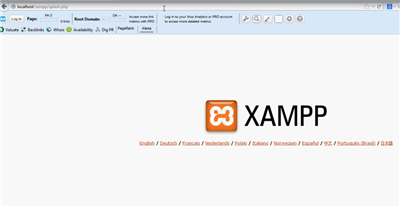
4. Now that the services we needed are up and running, let us continue with our goal and that is to install WordPress locally. To check if you have installed Apache successfully and if it is running as expected open a web browser and type http://localhost/ in the address bar. You should see something like below, just select the appropriate language.
The next thing we need to do is setup our database that our WordPress is going to use.
Setting up WordPress Database with XAMPP
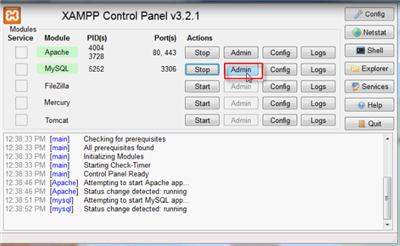
1. Go back to your XAMPP Control Panel and this time click on Admin from MySQL row. This will open your browser and redirect you to http://localhost/phpmyadmin/
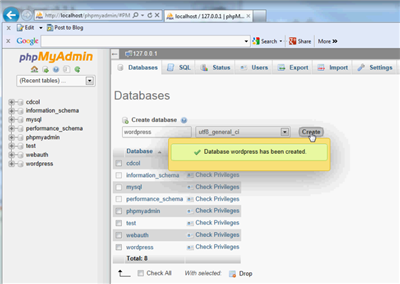
2. Now click on Database tab. This will allow you now to create a new database. Type the database name you wish for your local WordPress installation. And select utf8_general_ci for the proper Collation.
3. That’s it! So our Apache and Database is now ready. We can now proceed to the main event of this article and that is to install WordPress locally.
Guide To Setup WordPress Locally with XAMPP
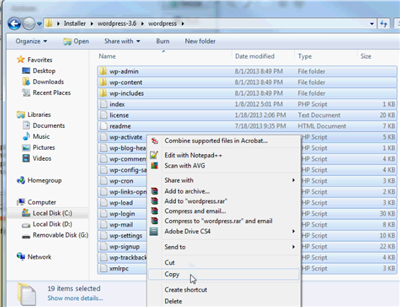
1. Decompress the WordPress file you have downloaded. Then select all the files and folders and copy them all.
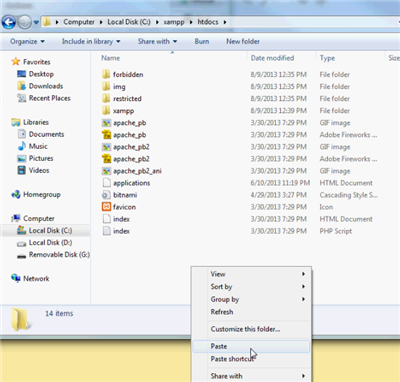
2. So where to copy all of these files? Go to the htdocs directory where you installed XAMPP (i.e. C:\xampp\htdocs).
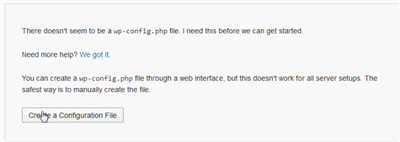
3. Once you have copied everything, go back to your browser and type again http://localhost/. This will now invoke the WordPress config file wp-config.php.
4. You need to setup the WordPress database. So this is the first thing you need to setup. Use “root” as the username and leave the password blanked. Database name is “localhost”.
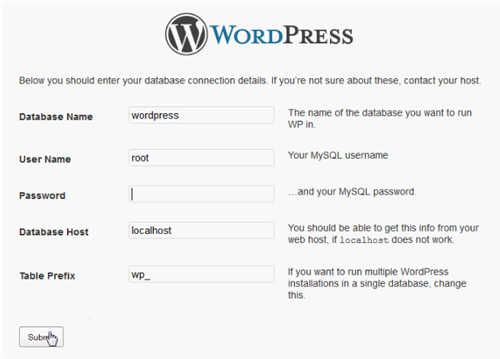
5. Click “Run Install”.
6. You will asked to type in all the details for your local copy of Wodpress.
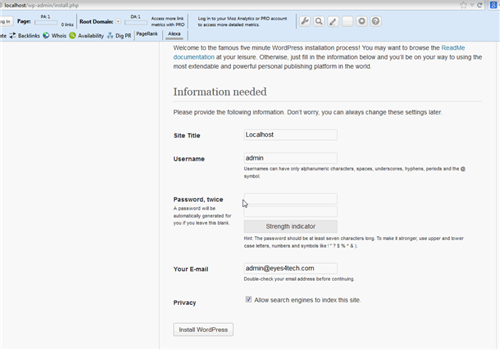
7. Basically that’s it! You now have a local copy of WordPress on your PC.
If somehow you got lost on my steps above, you can watch the video below on how to install WordPress locally using XAMPP.
[youtube=href=http://youtu.be/aIwvqk53mfQ&w=600&h=338]


I have used XMPP on my MAC for the local development of wordpress plugins…Its really easy to install and manage if you cross the first time hurdle…
Its always advisable to have a local copy and try all the changes on that before moving them to live server….